Tuesday, December 20, 2016

Applique - The E-Z Way

Adding Applique
The E-Z Way

Basically I cheat.  I use iron on adhesives.  I glue my pattern to the back of the iron on.  I then cut it out.  And iron the pattern on and WIN!!


To begin I need the fabric.  I has been recommended to me to use the cheapest satin possible.  It unravels the least.  I havn't experimented with other fabrics.  But cheap satin does totally work.  I print out my design,  Pearl's star, full size.   And I had some Loctitie 300.  You could use other glue.  I recommend a spray glue.

My fabric is a little wrinkled.


Here is my iron on material.  It is EPIC.  So useful!!

Once I have ironed on the iron on material.  I then glue on my pattern to the paper of the iron on material.  You can glue to the paper of the iron on,  because you will be removing it.  


I then cut out the fabric using the pattern and an Xacto knife.  And BAM Pearl's star is done.


I then spent about about a half hour getting it positioned right.  I measured from the seam points on the neckline.  From each point to the top of the star.  I kept moving the star until it the two measurements were the same,  well within a 1/16 of an inch.  But that made sure the star is centered on my chest.

BAM STAR!!!


It is machine washable,  Just use cold water.  And if the tips of the star start to come off,  a quick hit from the iron and you can readhere them!!

Sunday, July 31, 2016

Modding Pop Vinyls

Modding Pop Vinyls

I wanted to make a custom pop vinyl. I had seen other people do it and it looked fun. It looked like a quick way to learn/sharpen some skills for cheap.   Also everything I have learned about modding pop vinyls I learned from Britfang Cosplay.  Check him out.  Oh yes. 

I have a friend who likes pop vinyls, and that person has a birthday.  So it was time to make a pop vinyl.  The one problems I have found with pop vinyls is all the popular characters have been done. So I decided to do an interrogation scene Black Widow. I think it is an impressive scene. She is in control the entire time. 

This is what I came up with. 


There is already a Black Widow Pop Vinyl. I purchased one. And used the head.  Thus the head is done.


I looked for a female pop vinyl with a dress and a v neck-line.  I ended up with Six from Battle Star Galatia.  I had trouble finding a specific pop vinyl with this dress. I went to all the stores at the mall.  That was a bad idea. I found a Facebook group, the Funko Pop Checklist,  that is nothing but a list of all the Pop Vinyls. I could just scroll down and see them all. PERFECT.  


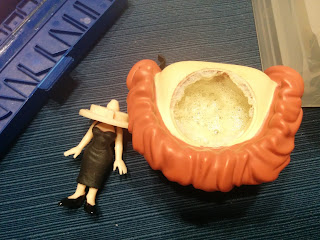
I soaked Six in hot water and the head popped right off. The Black Widow head is a bobble head, and Six is not.  So I covered the black widow head in masking tape, so I couldn't damage it.  


The inside of the Black Widow head.  It is very open. Also you can see the Six body with it's plug.  


To fill the head I added some expanding foam.  I added too much.

While the expanding foam was curing I painted Six's dress black.  I used a very small paint brush, and a tooth pick.


I cut away the giant mass of excess expandy foam. The inside still wasn't cured. A little googling, and I found out that if you add water, it can speed up the curing.  I tried it.  It works,  it expanded more.  I let it finish curing for a weekend.  Then I carved enough out for the body to fit. I wasn't sure how glue would react with the foam.  So I sealed the expanding foam with mod podge. I them used epoxy to secure the body to the head. 


I used some flesh tone paint and added rips in the body of the pop vinyl. I also used some black acrylic paint and mod podge (1 paint to 10 mod podge ratio) to paint on panty hose. I painted over the panty hose with flesh tone paint to make rips.


\


I super glued some twine to the wrists for the rope. I was concerned about the glue and the body. So I used tape as a buffer. 


In the movie she is wearing a gold necklace, and a gold bracelet on her right wrist.  And her dress has a silver zipper on the back.  I didn't have any acrylic paint those colors.  But I did have spray paint.  If you spray paint on something else (like a trash bag),  you can make a puddle. It takes a few seconds to dry.  I grabbed a tooth pick and painted on the necklace, bracelet, and zipper.


The person this pop vinyl is going to does not take them out of the box,  I think.
So I took the Six box apart. I taped over the clear part. And I spray painted the entire box white. 


I cut apart the Black Widow box. I wanted the Black Widow head.And the pop vinyl logo. To get the stripes on the pop vinyl box consistent in color I printed the design below.  And cut them out.  This also allowed me to type with name. I have sloppy hand writing.  Writing in white on red can be difficult.  But printing is super easy! Also I found a lot of people think the pop vinyl font is bebas neue (link)

And this is the end result! 

And yes.  With a little itty bitty piece of worbla,  I made a cell phone.  It is in her hand. A flip phone.  I painted a screen and buttons.


Thursday, June 2, 2016

Silvers Rayeligh


This cosplay consists of a pair of green shorts, an orange shirt,  cape,  wig, glasses,sword, flask, beard, and flip flops.

I did not make or modify the flip flops.

I started with a green pair of pants.
But the green wasn't perfect. So I lightened it with some spray paint made for silk flowers. The above pic shows the before and after of the pants. The inside of the pants are the original color.  

I then needed to 'put' dots on them. I did some experiments to see what method worked best,  and was washing machine safe.


I then hand painted the dots on trying to match the pattern.

I then cut them to length as shorts,  and hemmed them.

To the Shirt:
It was originally a turtle neck shirt.  A basic t-shirt.


I cut it in half in the front.  Then I sewed it back together to give the illusion of a button up shirt. 

Then modified it from a turtle neck to a v-neck.  


The cape:
I don't have any pics for the making of my cape.  I just took a bed sheet and a big piece of fabric. And sewed them together. And then I made a hood from the same materials. 

The Sword!!!


In the manga it states his sword is half of his height. I am 6 foot 4.  So my version should be 3 foot 2. I used this measurement to scale his sword and produce the above rendering.  
I printed the grip life sized and used it to carve out some insulation foam into the shape of the grip.  

I then sanded it round. And coated it in 6 coats of wood glue.  

And then one final coat of 5 minute epoxy.  The epoxy made it very strong. I then wrapped the grip in blue upholstery vinyl. I did sharpie the edges blue so they would be less visible. 

For the blade, I cut two long strips of 10 mm thick craft foam.  I used the sanding bit of a dremel to make a 1/2 in wide groove that is 1/16 inch deep to accommodate a aluminum bar running down the middle.  The bar is 1/2 inch  by 1/8 inch. 

I then glued the foam together around the aluminum with handy dandy contact cement.  

I then used masking tape to divide the blade in half.  And began sanding the bevel.  
Then I began sanding the flat part of the blade.  


The pommel is a piece of styrene that is the same thickness as the aluminum.  I sandwiched that between two pieces of sintra.  And sanded them smooth.

The cross guard was carved from a piece of styrene. I used the cheapest glue stick I could find to glue a pattern I printed onto the stryene.  And then the pattern was removed.  

Final Sword
Above is a pic of the beta sword. I recessed a wooden wheel into the pommel to make the gem.  The final version will use state of the art googly eyes!


Saturday, December 5, 2015

Professor Stein's Screw headpiece from Soul Eater

Professor Stein's Screw headpiece from Soul Eater


I did a professor Stein Cosplay.  I really like this character. It is easy to wear.  And the screw spins. I will admit it is fun when people stop you at a con,  and ask if the screw spins.  I never verbally answer.  I just spin the screw. Mine is very loud.  

The screw is a big empty cardboard box with a party clacker in it.  I feel the emptiness of the cardboard acts as a resonance chamber and makes the clacker even louder. Because my screw is quite loud.


Basically I have a head band.  I took small pieces of PVC and hot glued them to the head band. I also drilled small hole through the pvc and zip tied them to the head band.


Below is a pic of the party clacker.  I ended up removing most of it so it could fit inside the screw head.  The small white piece on the left is the axle for the party clacker. When I finished it became the axle for the screw head.


Below you can see the axle slides inside the PVC .  The axle has a gear on it that engages the clacker.  This gear also works as a flange to hold the screw head together.  

Below is a view of the axle from the view of the headband.  I used some cardboard inside the PVC to fill the gap between the PVC and the axle. 


Below is a view of the inside of the screw.


Below is the top part of the screw. I took the top of a round box from Joanns.  I trimmed the box to make it much shorter.  I installed the balsa sides for the screw slot. Then I cut the box for the screw slot. I also added some masking tape around the inside of the box.  I was trying to achieve a tighter fit on the lid.


 So below you see the parts of the screw head.  From left to right.  The PVC, the axle,  the bottom of the screw head, and the top of the screw head.